The
Honda CYB350
The decision to Build a CYB350 for Post Classic racing came about
for several Reasons. The Racing was to be for fun and enjoyment,
watching others on these Classic bikes and similar 350's and 450's
enjoying themselves sealed the subconscious deal many years ago.
A good mate in New Zealand Graeme
Duckett was the supremo builder, and there isn't much
Graeme doesn't know about bikes. New Zealand to me was a logical
and good choice of construction, as there were multitudes of available
parts there, they were easy to find, plus its where Ian
Johnson of the motorbikeshop lived.
The Selection process came down to a CB350
or a CB450,
but I preferred the CB350,
I felt it would be more fun to race. I do also think the 350 is
a better proposition than the 450, its lighter, handles better,
and goes like snot if done right, plus 350s are a better bet as
the valve operation is normal. Certainly it can run rings around
a 450, or even fully capable of squeezing out a 500cc single and
twin 500 fours. Graeme however has a soft spot for 450's, so guess
what he has to race on .........
The CB350 was a solid performer as a street bike, but also a very
common bike as more of these motorcycles were built than any other
single production motorcycle, so spare parts are still somewhat
available. So where I hang out, that means I'm going to enter
1963 to 1972 Period 4 Classic racing. As long as we stick to the
Aussie Road racing rule book.
The replica CYB350 is built with help from oldpictures and
the stories around them. These old pictures are from the Tokyo
Motor Show in late 1968?. This of course, is after Honda had finished
racing in 1968 - see
Honda's race history 1959 - 1968
The CYB350 was actually first produced in 1968 by
Honda RSC, and was originally very close to the standard CB350.
Below are some very coarse newspaper quality pictures, from
Joep. Main changes were a hotter camshaft and 10.5
: 1 racing pistons, CR Kei-hins with 31 mm dia, energy transfer
ignition (i.e., the generator directly connected to the ignition
coils and contact breakers), open megas, rear set foot rests,
special aluminium tank and polyester seat, racing type rev. counter,
clip-ons, aluminium rims and polyester fairing.
1968 RSC CYB350
1968 RSC CYB350
Suspension was standard, as were the brakes, no doubt with racing
type linings. The frame had some reinforcing tubes added, supporting
the tank, and an hydraulic steering damper. Claimed output was
50 bhp, a little optimistic, me thinks, compared to the CR77's
power output. Later Honda produced a hotter version. This was
a more "professional" bike, with racing type suspension and magnesium
brakes, 4ls at the front and 2ls at the rear. The rest of the
specifications were the same.
The 250 & 350 was used in classic racing around
the world.[See
Honda's race history 1959 - 1968] It's easy to tune
and proved to be very reliable and fast. The decision was made
to use Ian
Johnson of the motorbikeshop in picturesque
Welcome bay, Tauranga, New Zealand to modify the engine
heads and lighten the cranks etc.
Honda once made a "Sport pack" for this model in
the late 60s, and consisted of 91 items to convert the roadster
in to a racer. The very first CB350 racer from Honda was on display
at the TokyoShow autumn
1968, and Honda claimed a power output of over 50 bhp. In the
early 1970's Yoshimura also made a race kit for the 250's and
350cc twins.
Gas flow bench testing. Pistons: rcb Honda pistons 13:1 compression
lightened / squishband machined / head machined for more compression.
Tyres / Flanged rims 18inch 36 spoke DID or Acront etc. for
CB350 hub or (40) spoke
CB500/4 front disc hub Front forks: CB450 yokes / CB550 fork
legs and stauntions / CB500/4 front wheel (40 spoke) twin disc
2.5 in rims / tt100 Tyres.
Reservoir and hydraulic lines from CB450 - 500.Calipers from
CB500 / 550/4.
Fiberglass: tank / seat base / fairing / bum fairing
Cappellini
parts: Oil filter for original pump use, larger bore original
pump, oil breather, 5th gear?, special quality valves, magnetic
sump plug, various sprockets for the gearbox in 520 size chain,
Ignition:points or electronic. ? neutronic?
Fairing mounts and brackets. Rear set footrests and brake
assembly gearshaft modify to suit rearsets.
Where ever you live, you must make sure you comply with
the rules under which you intend to race. This applies also
to the Class you intend to race. For me this is the Motorcycling
Australia Road Racing Rulebook. The rules are strictly inforced
for racing and its various classes.
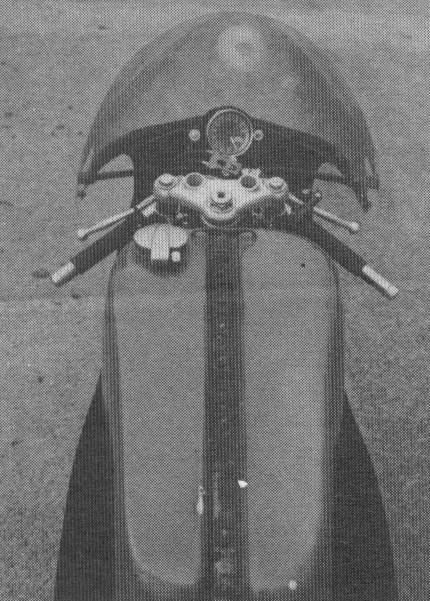
FRAME
We
used a Standard 1972 CB350 Motorcycle and therefore Frame
- See image at left. You could also I guess use a Honda SL350
frame as well, slightly different frame though.
Its of interest to note I guess you need to be careful
that its not a stolen basic bike you purchased or are intending
to use. Each State or Country has its own checking methods
to assertain if Vins are clear or not. Nothing worse then
completing your pride and joy to have the rug possibly pulled
out from under.
OK so you have your stock CB350, rip out the tool box and
pull it all apart - no need to worry to much about where
things belong too much as most will be disgarded
One needs to check for alignment to see if it has been
dropped and maybe tweaked out of plumb, and make sure there
are no cracks. Strip the frame by getting it sandblasted,
or use car paint stripper. Tip - paint has a way of hiding
defects to the naked viewing eye, so get it all off.
When this is done you can start delugging all the unwanted
metal from the frame and start seam welding all pressed
seams and some of the seams welded right up instead of gaps.
This welding, as you no doubt have worked out, is for security
and frame strength at speed. This afterall is what gives
you a secure stable platform for your race bike.
Oh delugging are things like the centerstand and related
brackets, the rider footpeg mounting brackets, the bracket
under the steering head, the brake pedal bracket and stoplight
switch bracket. At this time the brackets or mounting points
for the fairing are done, as well as the seat mount and
fuel tank mounts etc. There is such a variety of parts available
you could use - your brackets will need to be located to
suit what you already have or are going to use
The steering stop in our case was moved slightly higher
by 6mm to clear the Honda CB500 lower triple clamp and if
your wanting a steering dampened, nows the time to fit a
bracket. [You may find in your class of racing a damper
is required, so you need to check].
The frame was now prepped and painted by Graemes son.
Note on Welding: Unless you are proficient with
this task - get a competant welder to do it for you - its
an accomplished artform
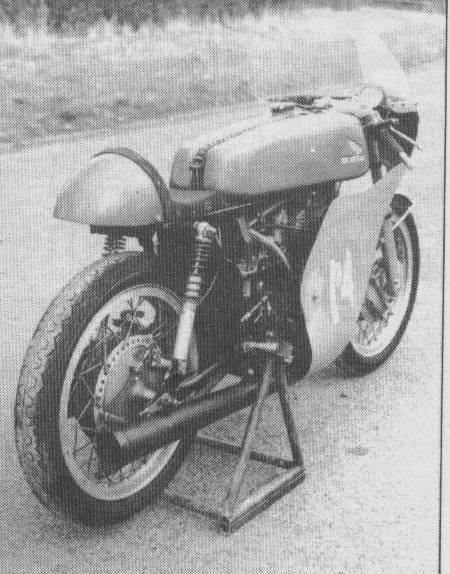
SUSPENSION
The original suspension is great for the stock road bike,
However for racing we chose a different setup. CB500/4 front
disc hub Front forks with an xs2 yam disc. CB550 fork legs
and stauntions, cb350 hanger and cb500/4 calipers, a CB500/4
front wheel with 18inch Flanged rims 36 spoke Acront. Front
guard was from a CB500
The rear wheel � ????????????? consists of a 1971 T500
rear brake hub laced to an 18-inch shouldered aluminum rim,
2.15 inches wide. Be sure to follow your rule book on rim
width, as different racing clubs have different rules on
this subject.
The rearsets were CBR900?????????. They are lightweight
and allow more ground clearance when cornering. These are
mounted in the holes originally used to mount the stock
exhaust.
The shifter had its bottom shift rod bracket cut and welded to
the top of the shifter to allow more room for the exhaust
to tuck under the frame and foot peg. The front shift shaft
lever also faced upwards and was off the CBR900RR as it
was longer and allows for extremely smooth shifts. With
the rear T500 brake being cable operated, be sure to mount
a brake lever stopper, so it won't return all the way up
or flop around on you.
The rear shocks used was a hagon ???? [we really wanted
Konis - but couldnt get them]. These are taller than stock
and are dampening adjustable. While assembling your rolling
chassis, We recommend, and its common sense to replace all
bearings, i.e.: steering stem with tapered roller bearings,
wheel bearings with double dust seal type, new swingarm
bearings and bushings - bronze bushings if you can find
them or have them made. Any play in these areas and you
may get a real live tank slapper - one is not a happy camper
if that occurs.
CONTROLS
We used a set of clip-ons rather than clubman??? bars,
which work just as well, because of their adjustability
up and down the forks. For the clutch we used a CB450 twin
clutch and front crank gear. The reason behind this is that
this speeds up the gearbox giving a close ratio effect.
For the brake side we used a CB500/4 front disc hub. The
throttle was off the 1976 Honda GT500 ??????.
The Engine ..........
While the Honda CB350 engine in stock form is quite potent,
it also lends itself quite readily to some added horsepower.
I opted for more performance, being a rev head, so the
task was given to
Ian Johnson of the motorbikeshop in NZ. Ian
lightened the cranks and worked his magic on the heads.
If you choose not to modify your engine right away, you
still need to disassemble it, check it out and replace
any worn components because of the loads it will be asked
to work under, check cases / spigot housing etc. for stress
cracks etc.
You can also decide to get it blueprinted and balanced
(this involves making sure your pistons, rods / cranks
etc. are equal weight, carbs need to be matched to intake
and intake to heads etc.) This alone will make the engine
much faster, smoother and reliable than before, it was
afterall a mass produced production run assembly line
bike. Another option is to undercut the gears, which aids
not slipping or jumping out of the selected gear under
high or extreme race loads
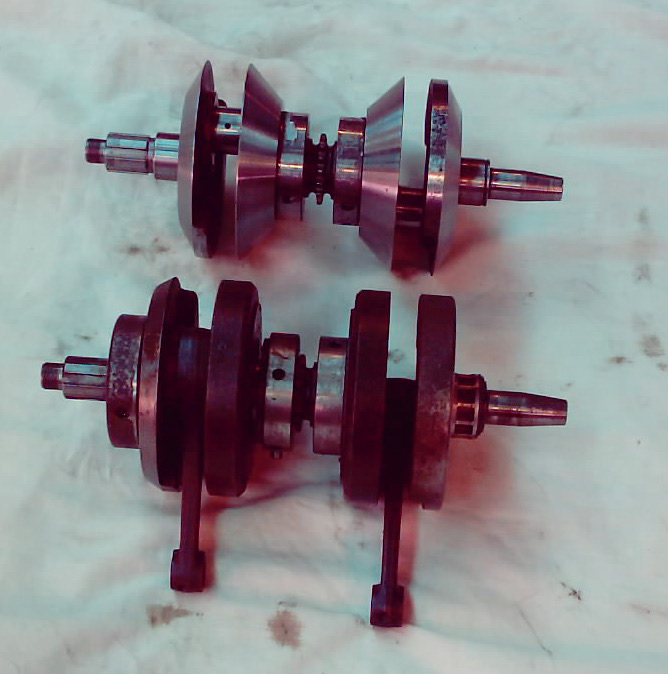
The lightened cranks
Franco
Cappellini parts are superb. The plunger
pumps used on 350-450 Hondas had non return spheres that tended
to float at high revs restricting oil delivery. The Eaton
geared pump delivers more oil the faster you go and is gear
driven off the crank (the new pump requires milling the crankcases
though). The valves for the engine are premium quality for
racing. The oil filter housing eliminates the pressure robbing
centrivical filter and has a disposable cartridge filter.
Can housings are needle roller converted and need less oil
to perform compared to plain bushings and carry load better
and allow freer revving. etc. etc. ....
Franco
Cappelliniparts chosen: 1 x filter housing
- we can interchange these between motors, 2 x needle roller
cam bearing housings, 1 for each motor, 1 x oil cooler,
1 x oil lines from filter to cooler, 1 x oil line from cooler
to cam housings, again we can interchange between motors
if ever needed.
We chose the 123-40 cam from Megacycle Cams,
in San Rafael, California. These cams have to be used with
racing pistons. Its also recommended to use high-performance
valve springs to prevent valve float at high RPM, this can
cause valve and piston damage. The reason we chose the 123-40
cam is that it gives me more top-end horsepower without sacrificing
bottom end and midrange performance.
Note: You will need to clean out the
entrance for the cams in the cam box so the redesigned cam
lobes will fit, clean the ridges off the cam box floor and
enlarge the opening in the cam sprocket. That's baically it
to fit the new 123-40 cam. If your cam rockers are worn you
will need to have them reworked or hardened or get new ones
from Honda.
As far as pistons, chosen was the 348cc / 13:1
compression RCB Honda pistons. Along with the pistons, we
also got high performance valve springs. We chose these pistons
for their high compression and light weight compared to the
stock ones. This high compression piston with its lighter
weight helps maintain the low-end torque and gain top-end
speed at slightly higher RPMs.
Note: If you use these, you will have
to check piston to head, valve to piston and piston to sparkplug
clearances to make sure that the piston does not hit anything.
You may also have to watch your tach closely while racing
with this engine setup.
The ??????? valve springs are smaller, lighter
and stronger than the stock ones and allow one to rev the
motor higher with less chance of valve float as they return
the valves quicker.
The intakes need to be enlarged in the carb area to accept
34mm Mikuni carbs and slightly enlarged all the way through
to the valve seat area. The exhaust were ???? and matched.
Be sure to use new intake manifolds.
Note: Disassemble the entire motor and check
it for wear and, if you find any, replace the worn part[s]
or repair it. A weak point are the cam chain rollers, these
are soft rubber and barely last a season of racing, so be
sure to replace these along with a heavy duty cam chain such
as Tsubaki. Check the crank for play or wear as it will get
quite a workout.
The transmissions were plucked from a couple
of CB500's. This brings gearing closer together allowing for
less RPMs lost in shifting. ???? [This actually lowers fifth
gear and you may have to use taller gearing for faster race
tracks].
The transmission gears should be checked for wear on the teeth
and shift dogs, and replaced, if wear is noticeable. Also
check for wear especially in first and second gears as well
as the shift drum. Any wear is dedected in the tracks of the
drum then it should be replaced. In the clutch department
check out the steel discs to factory specs and also check
them for signs of burn or warp.
Install a set of Honda friction discs and Honda CB500 clutch
springs, or shim the stock springs with spark plug washers.


