My Dave Dodge (DRP) Drill'n'Tap Oil Mod
Installation
-by Greg Terpin [used with permission]
There
are many flavours of oil mods documented at http://www.sabmag.org/ such as the Tierney-Hollen
Oil Mod Kit, Art Reitsma's T-H Style Mod, Dave Berkey's T-H
Style Oil Kit, the Original Landry Oil Mod, Landry-Schoeb
Oil Mod, Tony Donisi's Landry-Schoeb Oil Mod, Brian Sydness'
L-S Oil Mod, L-S Oil Mod with Cam Bearing Oil Passage Enlargement,
the Poor Man's Oil Mod and the 15 Minute Oil Mod. I have yet
to see anything documenting the Drill'n'Tap oil mod kit offered
by our V4 guru, Dave
Dodge.
This
page will be dedicated to my effort(s) in installing this
oil mod kit. It should be noted that I am in no way getting
compensated for my views. In addition to the parts supplied
with the Drill'n'Tap oil mod kit, the following supplies will
be necessary to complete the installation:
a
11/32" drill bit
a
1/8 NPT Tap (1/8 - 27)
teflon
tape for all pipe thread fittings for proper sealing against
leaks
a
new clutch cover gasket and exhaust gaskets if damaged
during removal
My installation began with the removal of the exhaust,
radiator and carbs. Yes it's a lot of prep work, but
my bike was due for a valve adjustment and carb cleaning
anyway.
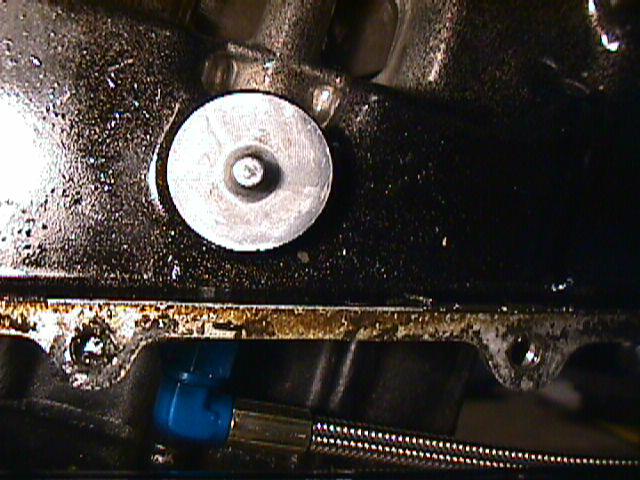
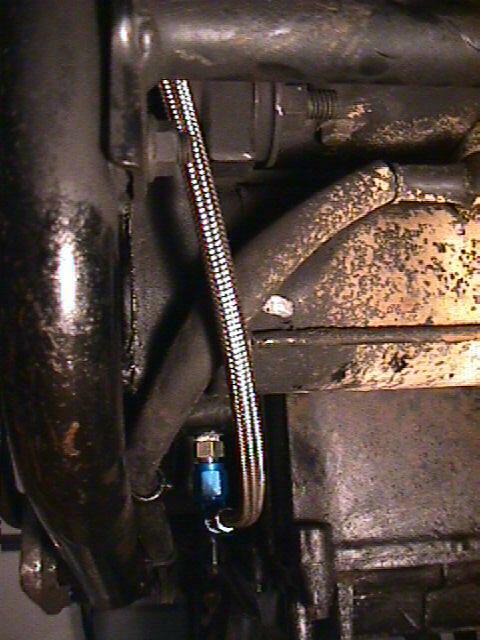
This
picture to the left shows the right side clutch cover
being removed. Removal of this cover is necessary
in order to gain access to the oil gallery via removal
of the plug shown in the middle of this pic. If you
look carefully in the expanded picture, you'll see
the SS oil line already connected to the tap. These
pictures were taken after I had already completed
the installation. A lot of the preliminary work has
already been documented by previous folks as noted
in their complete installation instructions/procedures
again found at http://www.sabmag.org/.
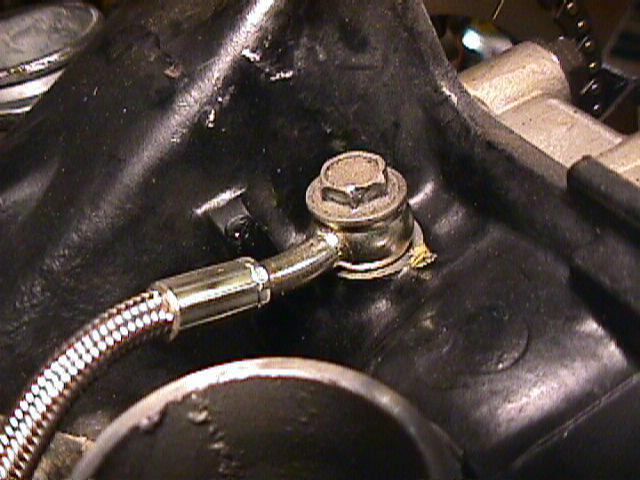
This next picture to the right shows the plug being
removed allowing access to the oil gallery. Pictured
is the tap that I have already inserted.
Prior
to installing this tap, I cleared out as much oil as I could
and tightly packed in a greased rag to trap any metal shavings
from the drilling and tapping operation. If one doesn't
carefully clean out this area, your cams won't enjoy having
metals bits circulating around them at higher pressure.
So obviously, a poor clean-up job would defeat the purpose
of installing this oil mod in the first place.
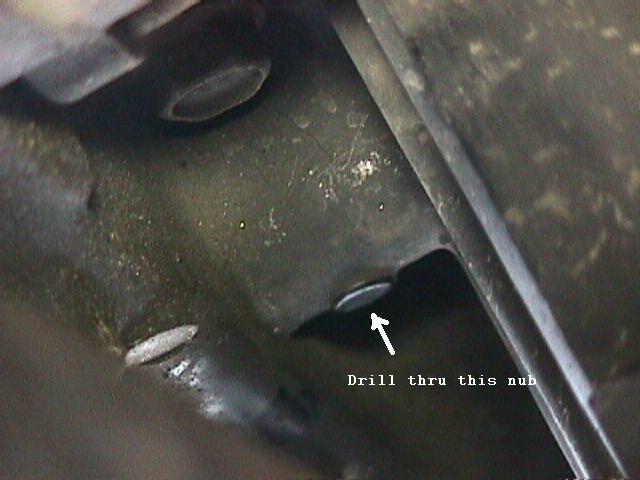
When you've mustered up the confidence to drill into your
oil gallery, you'll then need to find the recommended spot
to drill into. Note the arrow in the expanded picture. This
little nub, located directly beneath the oil gallery,
looks as if Honda intended for us to eventually figure out
we had to drill'n'tap this spot in order to get filtered
and higher pressure oil to flow to the heads.
It
is highly recommended that the exhaust be removed for ease
of drilling, tapping the hole and finally tightening down
the fitting. Removal of the exhaust is also helpful when
connecting the SS oil line to the fitting.
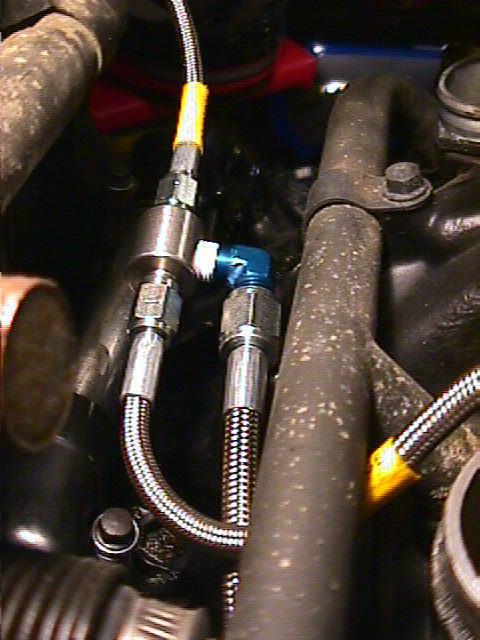
This next two pictures shows the SS oil line connected to
the fitting and the routing coming from the underside of
the engine
Tightening
of the line was achieved from the side of the bike with
an open ended wrench. Had the exhaust still been on the
bike, I don't believe I would have had the room to tighten
down the connector to the fitting.
The
routing picture shows how the SS oil line is routed forward
of the motor mount and behind the cross member frame tube
and up towards the inside of the "V" in the V4 motor. The
stiffness of the SS oil line allows one to route this SS
oil line without using stand-offs.
These
next few pictures show how the #4 SS oil line is routed from beneath
the engine, to the middle of the "V" and then to a splitter which
then routes two additional #3 SS oil lines. These lines replace
the stock oil lines that were earlier removed from the bike. Again,
the stiffness of the lines allow nice and clean routing. Not shown
is the plug which replaces the banjo bolt from the transmission
which used to provide the original source of oil to the heads.
The
second picture from the left shows again the routing from
the splitter to the cylinder heads this time from the left
side of the bike.
The
next picture shows how the #3 SS oil line is connected to
the front two cylinders. New crush washers are included with
DRP's Drill'n'Tap oil mod kit. Be sure to use them.
This
last pic shows how the #3 SS oil line is connected to the
rear two cylinders. Again, new (provided) crush washers were
used.
This
oil mod may not be for the faint of heart. I must admit I
had serious reservations in drilling into my oil gallery.
I've had several of these kits in my possession for several
months and it was only now that I felt I was ready to tackle
this project. It helped that I felt my bike was ready for
preventative maintenance anyway so I scheduled my time accordingly.
This will definitely not be a 15 minute oil mod. If you plan
this around a carb cleaning and valve adjustment... allocate
an entire weekend to finish this project. If you happen to
break and/or tear your clutch or alternator gaskets... expect
your bike to be down even longer while you order these parts.
Speaking of parts, now would also be a good time to possibly
replace your carb boots (which might be rock hard) with new
ones. Having pliable rubber will greatly reduce the
effort needed in R&R'ing your carbs.
My
choice in choosing this mod as opposed to the adapter
style mods was cost. Since I own several V65s (both Magnas
and Sabres)... saving $100 USD per kit adds up to quite a
bit for me. At some point I expect to perform this mod to
all of my bikes.